
How to Use the Booking App
and use tickets
- Log in: go to app.academia-tutor.com/login and enter your email and password. You can also use the “Login” button at the top right of this website.
- Remaining tickets: shown as “Ticket Balance” on the first page after you log in (Dashboard).
- Buy tickets: open “Buy Tickets” in the menu, choose a package and pay by card.
- Book a lesson: open “Book a Lesson” in the menu, choose an open time and press “Request lesson”. The lesson is confirmed when the teacher approves it.
- Cancel: press “Cancel” under “Upcoming” in “Reservations”. If the lesson hasn’t started yet, your ticket comes back.
- Change a booking: cancel the current booking and book the new time (there is no button that moves a lesson to another time).
- Lesson history: at the bottom of “Reservations” in the menu, under “Past Lessons”. It also shows how many tickets each lesson used.
1. How to log in
The first time
The school creates your account after your first lesson, so you do not need to sign up yourself. When your account is ready, you will receive two emails from us: an invitation and a 6-digit code.
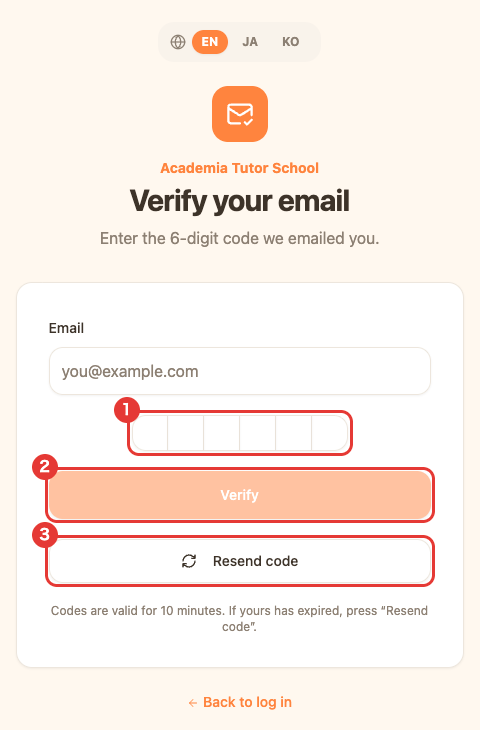
Please check your spam folder. You can also send a new code from “Verify my email with a code” at the bottom of the login page.
After the first time
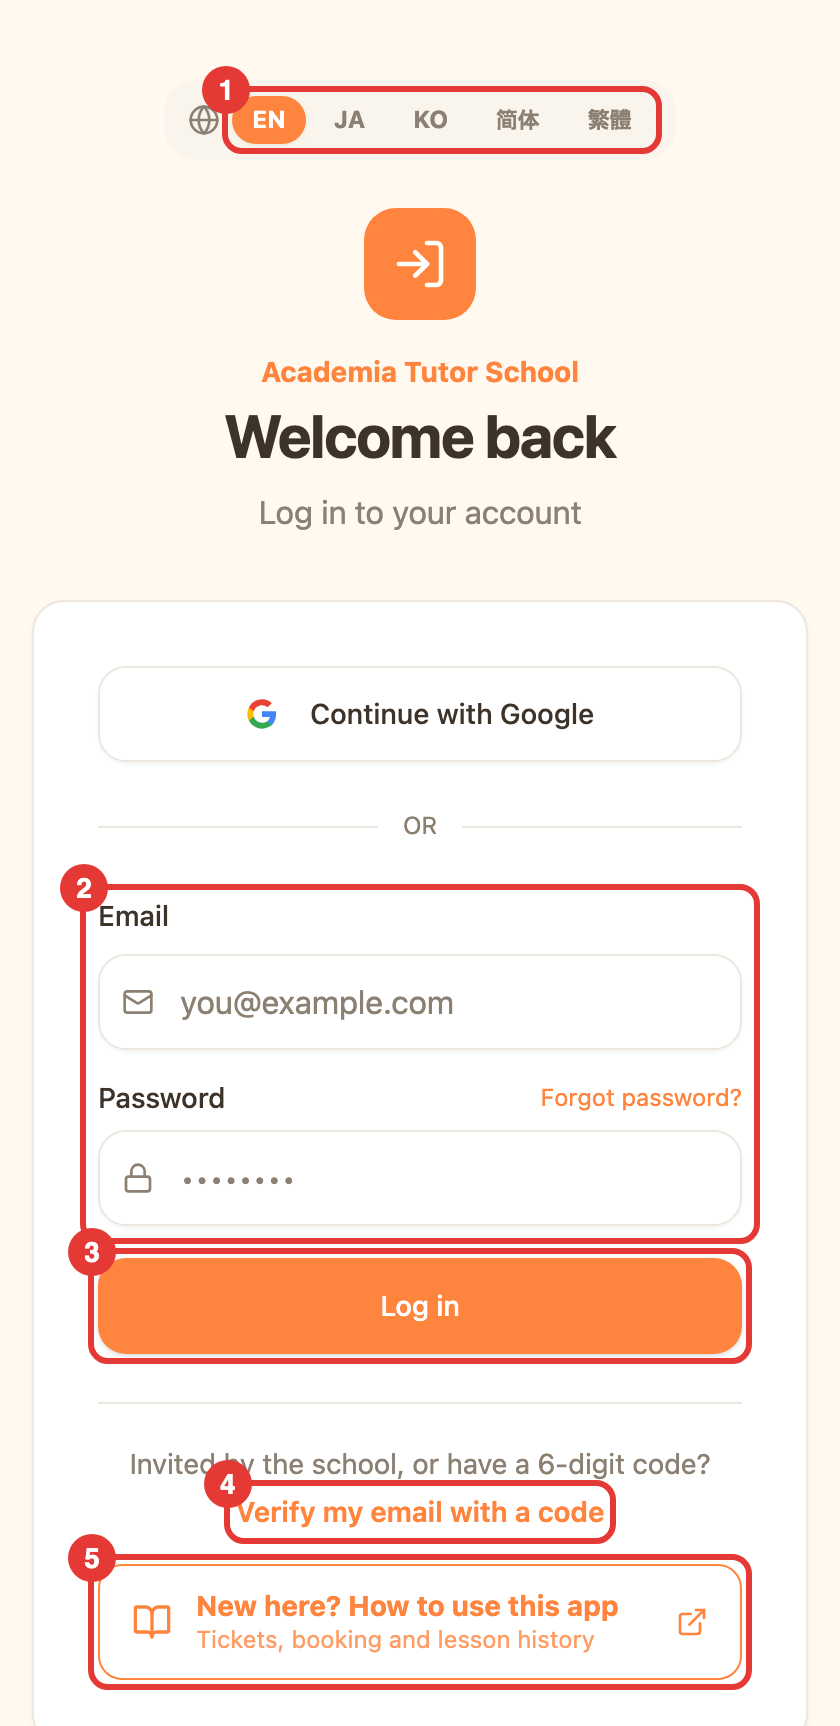
- Open app.academia-tutor.com/login, enter your email and password, and press “Log in”.
- If your login email is a Google account (such as Gmail), you can also use “Continue with Google”.
- Forgot your password? Press “Forgot password?” and we will email you a link to set a new one.
- After you log in, you can change your email or password in “Account settings” in the menu.
Language and time
- Language: switch between English, Japanese and Korean with EN / JA / KO at the top of the screen (on a computer, at the bottom of the menu).
- Time: times are shown in Hawaii time (HST) at first. To see Japan time (JST), use the HST / JST switch in the same place.
- On a phone, press ☰ at the top right to open the menu.
2. What’s in the menu
- Dashboard: your ticket balance and your next lesson (with the Zoom link).
- Book a Lesson: choose a time when a teacher is available and send a booking request. It is confirmed when the teacher or the school approves it.
- Buy Tickets: buy lesson packages.
- Reservations: upcoming lessons, requests waiting for approval, cancelled lessons and past lessons (your lesson history).
- Students: add and edit your children (up to 5).
- Account settings: change your login email and password.
- How to use this app: opens this page (also on the login page and the Dashboard).
3. Check your remaining tickets
On the “Dashboard”, the first page after you log in, “Ticket Balance” shows your “Remaining Sessions” as a large number. The same number is shown at the top of “Buy Tickets”.
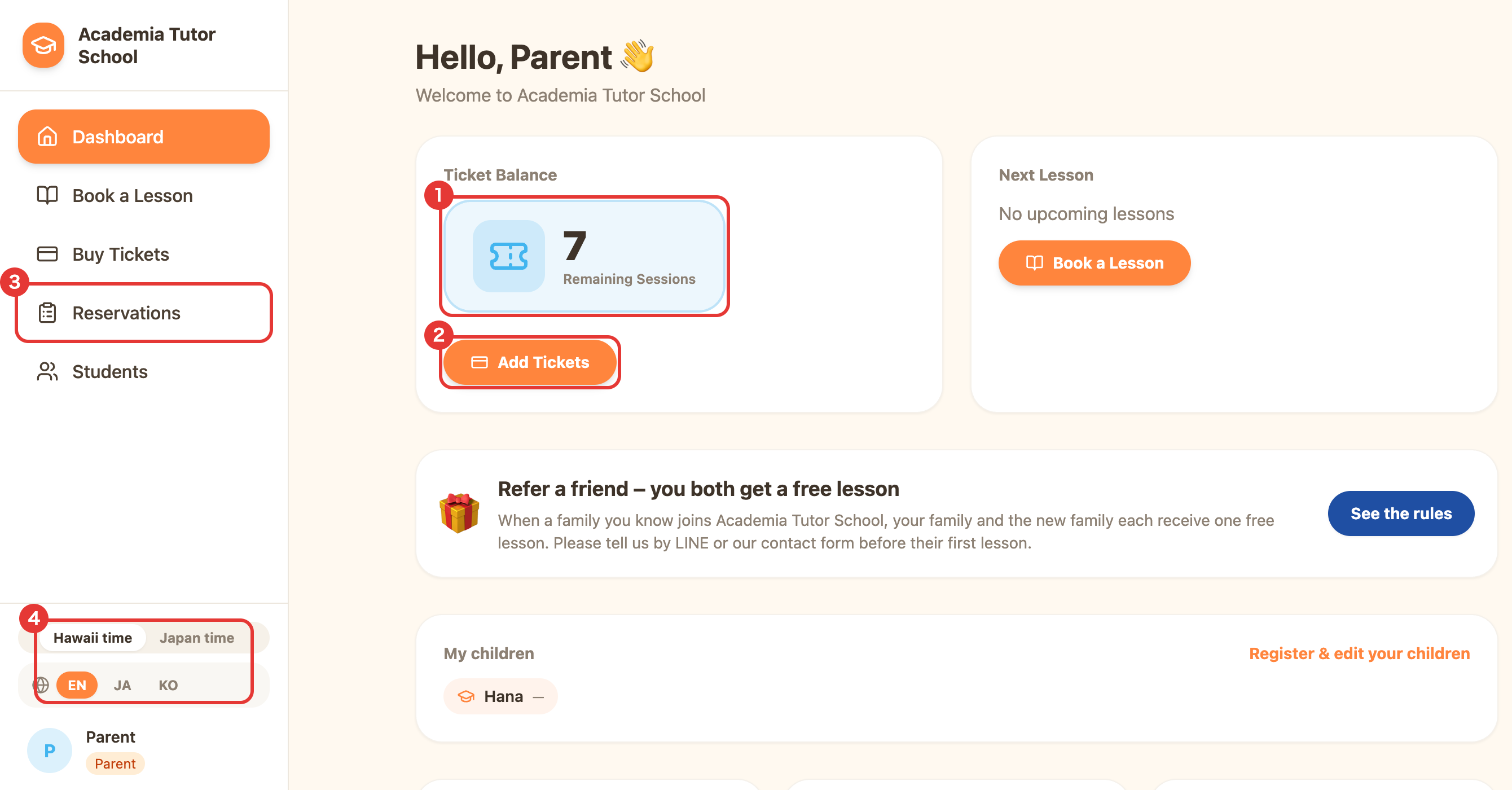
- A private lesson uses 1 ticket. A group lesson uses 1 ticket per person attending.
- Tickets are used when a lesson is confirmed (for weekly lessons, at each lesson’s start time). If you cancel, the ticket comes back.
- When you have lessons booked ahead, “Booked ahead: N lessons” is shown under the balance.
- The balance turns yellow at 2 or fewer, and red at 0 or below.
- You can still book when you don’t have enough tickets. Your balance then goes below zero and a “Buy tickets” notice appears. Please buy a package before the lesson.
4. Buy tickets
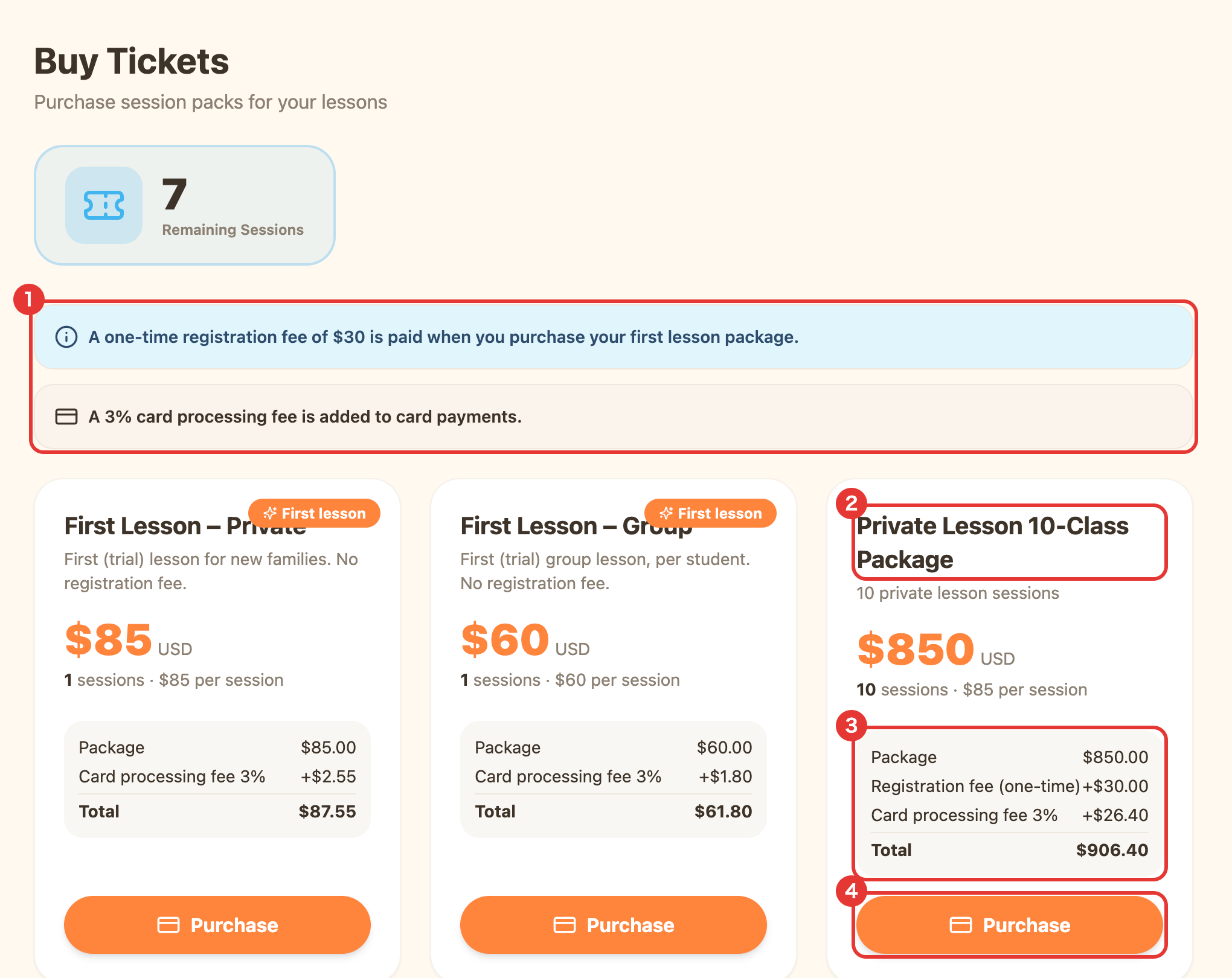
- “First Lesson” products are shown only to new families.
- The $30 registration fee is paid once, with your first package. If the screen says “Registration fee: paid” or “Registration fee: not required”, it is not added.
- A 3% card processing fee is added to card payments.
- To pay another way (cash, bank transfer, etc.), please contact us by LINE or our contact form. The school records the payment and adds your tickets.
- For prices, see Tuition (lessons).
5. Book a lesson
Booking works as a request. You choose an open time and send a request, and the lesson is confirmed when the teacher or the school approves it. No ticket is used until then. Before your first booking, please add your child under “Students” in the menu.
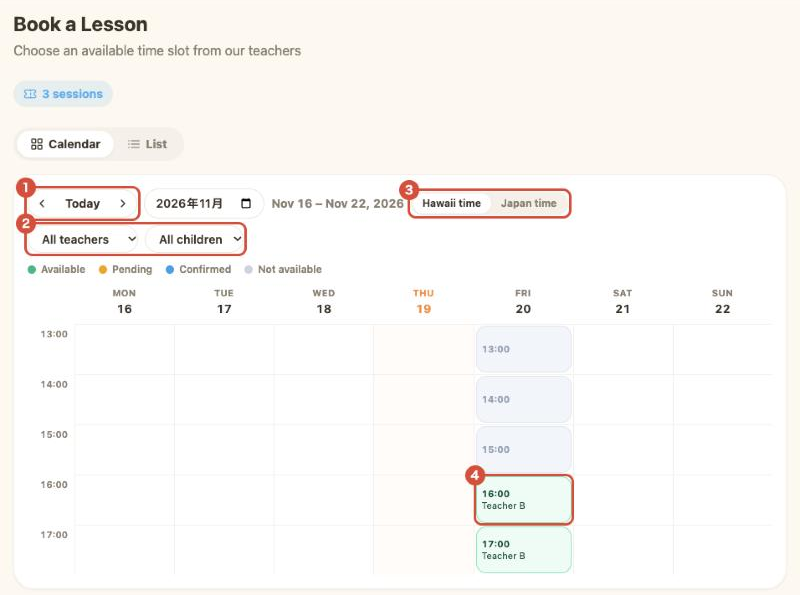
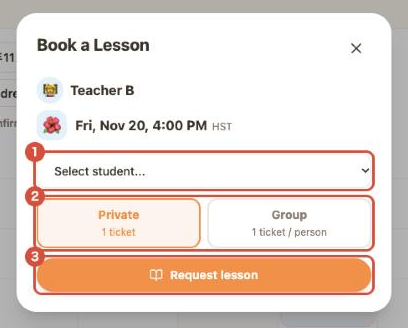
Your request appears under “Pending requests” in “Reservations”. Once it is approved, it moves to “Upcoming” and is also shown as “Next Lesson” on the Dashboard. A request that is still not approved when the lesson time arrives expires and moves to “Declined / expired”.
The calendar can show Hawaii time or Japan time, using the HST / JST switch. If your child takes lessons from Japan, switching to Japan time before you choose helps avoid mistakes. You can book even when you don’t have enough tickets, but your balance will go below zero, so please buy a package before the lesson (see 3. Check your remaining tickets).
6. Cancel a booking
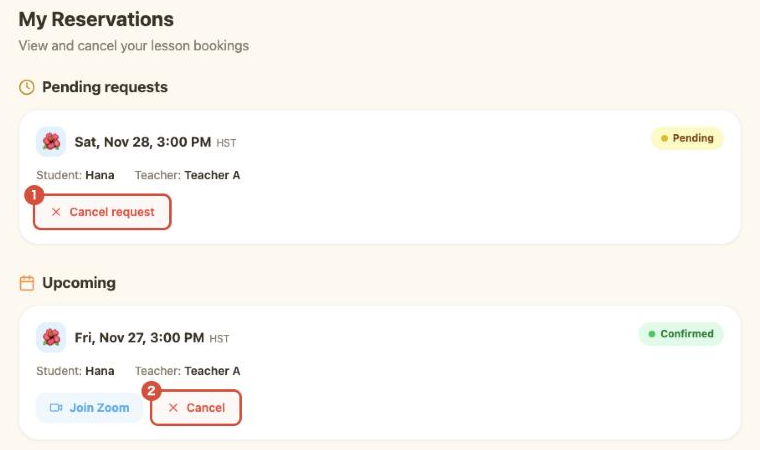
Cancel a confirmed lesson
Open “Reservations” in the menu and press “Cancel” on the lesson under “Upcoming”. When “Cancel this lesson? Your ticket will be refunded.” appears, press OK. You can cancel your nearest lesson the same way from “Next Lesson” on the Dashboard.
When you cancel, the ticket used for that lesson goes back to your balance, and the time slot opens up again for other families to book. The lesson then appears under “Cancelled” in “Reservations”, marked “Cancelled (Parent)”.
Withdraw a pending request
A request that hasn’t been confirmed yet can be withdrawn with “Cancel request” under “Pending requests” in “Reservations”. No ticket has been used, so your balance stays the same.
Once a lesson’s start time has passed, it can’t be cancelled in the app. If your child has to miss a lesson at short notice, or you’d like to change the day or time of a weekly lesson, please contact us by LINE or our contact form.
7. Change the date or time of a booking
The app doesn’t have a button that moves a booked lesson to another time. To change it, cancel the current booking and then book the new time. Your ticket comes back as soon as you cancel, so it is never used twice.
Your new request shows under “Pending requests” until it is approved. Once it moves to “Upcoming”, check that the new date and time are right.
If you’d like to change the day or time of a weekly lesson the school has set up, move just one lesson to another day, or can’t find an open time right before the lesson, please contact us by LINE or our contact form. The school will move it for you.
8. See your lesson history
Open “Reservations” in the menu and scroll to the bottom to find “Past Lessons”. Newest first, each lesson shows:
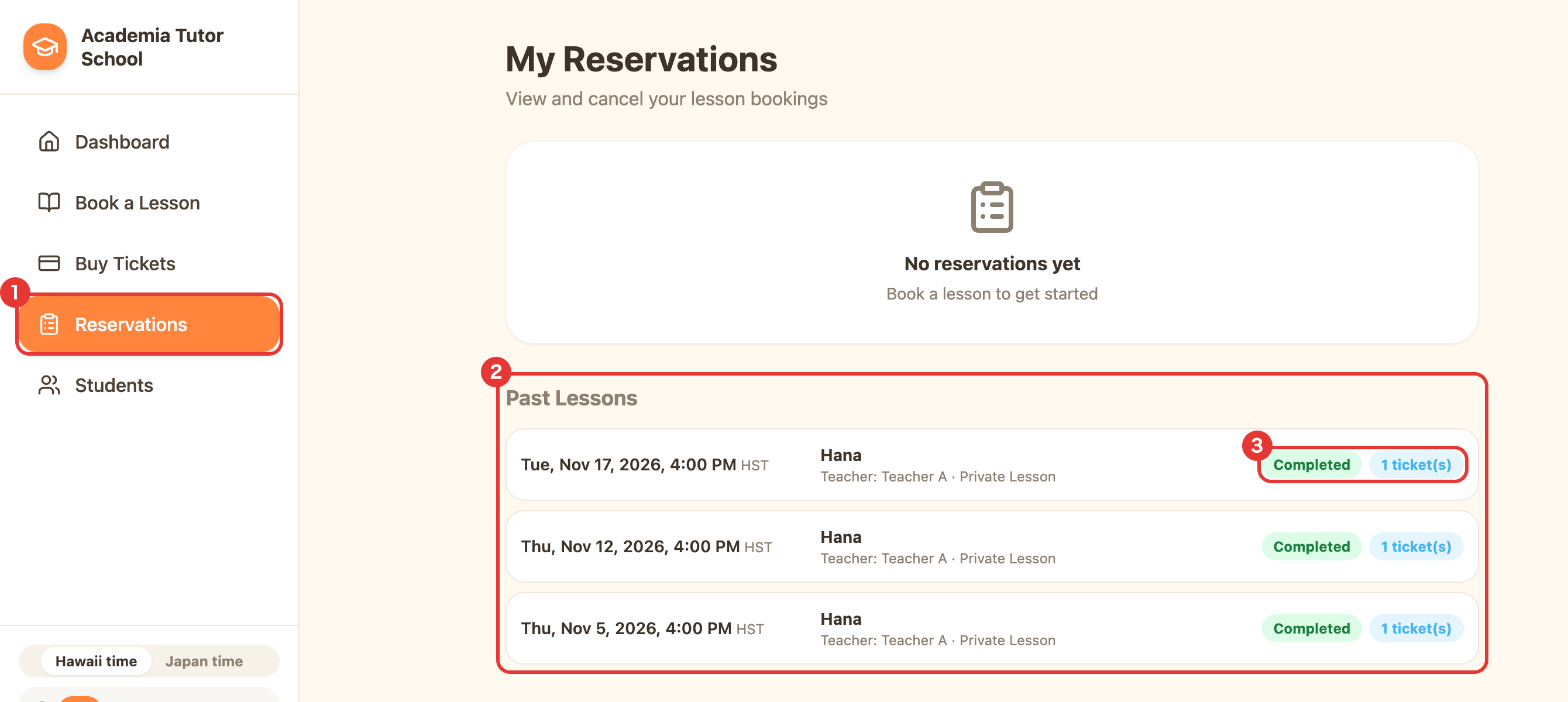
- The date and time (Hawaii or Japan time)
- Your child’s name, the teacher, and private or group
- The status: “Completed”, “No-show” or “Cancelled”
- How many tickets the lesson used (for example “1 ticket(s)”)
Lessons taken before you started using the app also appear here when the school has entered them.
Other parts of Reservations
- Pending requests: bookings that are not confirmed yet. You can cancel them at any time (no ticket has been used).
- Upcoming: confirmed lessons, with “Join Zoom” and “Cancel” buttons.
- Cancelled: lessons cancelled by the teacher or by you.
9. Past tickets (bought and used)
- Tickets used: each row of “Past Lessons” shows how many tickets that lesson used.
- Tickets bought: the confirmation email you receive after each purchase shows the package and the amount.
- Your current balance is always the “Ticket Balance” on the Dashboard. If the number doesn’t look right, please contact us and we will check the record of your tickets.
If something doesn’t work
- “The email or password is not correct”: set a new password from “Forgot password?”.
- The code didn’t arrive or has expired: press “Resend code” and enter the code from the newest email.
- Want to change your email? In “Account settings”, use “Change email”. A 6-digit code is sent to the new address to confirm it.
For anything else, please contact us by LINE or our contact form.